


There's a moment every homeowner or facility manager eventually faces. You look down at your floor and realize it's telling a story you don't want it to tell. Cracks running through the slab. A dull, worn surface that used to look sharp. Maybe some staining that no amount of scrubbing can fix.
That moment is actually a good thing. It means you're ready to do something about it.
The truth is, most floor problems come down to two root causes. Either the surface wasn't protected properly from the start. Or damage was ignored long enough to become a real structural issue. Both are fixable. But fixing them the right way in the right order is what separates a floor that lasts decades from one that fails in a few years.
In Woodland Park, NJ, where seasonal freeze-thaw cycles put serious stress on concrete, this isn't a minor concern. It's something every property owner here should understand before spending a dollar on any floor project.
That's where professional epoxy flooring services come into the picture. Done right, epoxy doesn't just make a floor look better. It creates a sealed, bonded system that protects the concrete underneath from moisture, impact, chemicals, and daily wear. It turns a vulnerable surface into a durable one.
But here's the catch. Epoxy or any premium finish only performs as well as the surface it's applied to. If cracks are ignored before coating, you're not protecting your floor. You're decorating a problem.
Why Crack Type Changes Everything
Not all cracks are the same. And treating them the same way is one of the most common and costly mistakes in floor restoration.
There are three main categories worth knowing.
Hairline cracks are thin surface fractures. They usually come from concrete shrinkage during the curing process. They don't threaten structural integrity, but they do need to be filled before coating. If left open, moisture enters, freezes, expands, and turns a hairline into something much worse.
Settlement cracks happen when the ground beneath the slab shifts or compresses unevenly. These are wider, sometimes with one side sitting higher than the other. They're more serious and need proper repair before any finish is applied.
Structural cracks are the ones that demand attention before anything else. These run deep, show displacement, or continue to grow. In some cases, a structural engineer should assess them before a flooring contractor does anything. This is especially true for Woodland Park, NJ properties with older slabs or significant soil movement history.
Understanding which type you're dealing with changes your repair method, your material choice, and your timeline.
Repair Methods That Actually Match the Problem
Once you've identified the crack type, the repair approach becomes clearer.
Epoxy injection is used for deep, narrow structural cracks. A low-viscosity epoxy is injected under pressure into the crack, filling it completely from the inside out. It restores tensile strength to the slab. This is a professional-grade repair.
Polyurethane foam injection is the right call for cracks that are still moving what's called "active" cracks. Polyurethane stays slightly flexible after curing. It accommodates ongoing movement without re-cracking. Epoxy doesn't do this. Using epoxy on an active crack means the crack will return.
Epoxy paste and filler works well for surface-level and cosmetic cracks. It fills the void, levels with the surrounding concrete, and accepts coating on top. This is what most DIY-friendly repair products are designed for.
Routing and sealing is used for joint cracks in the lines between concrete sections. The crack is widened slightly with a saw, then filled with a flexible sealant that allows the joint to move without cracking the filler.
Getting this match right is the foundation of everything that comes after.
Surface Preparation: The Step That Decides Everything
You can choose the most expensive premium finish on the market. If the surface prep is wrong, it will fail.
This is not an exaggeration. Most coating failures peeling, bubbling, delamination trace back to inadequate preparation. Not material quality. Preparation.
The first thing any serious installer does is a moisture test. Concrete naturally holds moisture. If the vapor emission rate is too high, no coating will bond properly. This test takes minutes and prevents expensive failures. In Woodland Park, NJ, where groundwater levels can affect basement slabs especially, this step is non-negotiable.
Next comes mechanical surface preparation. The two main methods are shot blasting and diamond grinding. Both open the concrete's pores, removing latitude (the weak surface layer) and creating a profile for the coating to grip. Shot blasting is preferred for larger areas. Diamond grinding offers more precision for smaller spaces or edges.
Then the surface is cleaned thoroughly. Oil, grease, old adhesive, curing compounds all of it has to go. Any contamination left behind creates a barrier between the concrete and the coating.
Finally, a primer coat goes down. Primer penetrates the concrete, seals the surface, and dramatically improves adhesion for the layers that follow. Skipping primer is a shortcut that always shows up later as a problem.
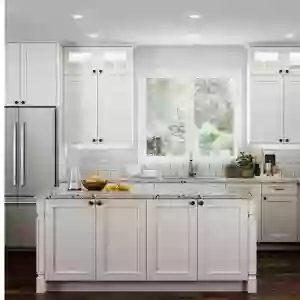
Premium Finish Options Worth Knowing About
Once your surface is properly prepped and cracks are repaired, you get to make the interesting decisions.
The premium finish market has expanded significantly. You're no longer choosing between "shiny" or "not shiny." Here's what's actually available:
100% solids epoxy is the workhorse. It's dense, hard, and extremely durable. It bonds tightly to concrete and creates a surface that handles heavy loads, impacts, and most chemicals. It's the backbone of most commercial and industrial floor systems.
Metallic epoxy takes the same durability and adds a dramatic, three-dimensional appearance. Pigments and metallic powders create depth and movement in the surface. No two floors look the same. Popular in showrooms, restaurants, and high-end residential spaces.
Polyaspartic coatings are UV-stable and fast-curing. Unlike standard epoxy, they won't yellow under sunlight. They're often used as topcoats over epoxy base coats, or as standalone systems where cure time and UV stability are priorities.
Polyurea topcoats are extremely flexible and chemically resistant. They're often the final layer in a multi-coat system, providing the surface protection that extends the life of everything underneath.
Quartz broadcast systems embed colored quartz aggregate into the coating during application. The result is a textured, slip-resistant surface with excellent durability. Common in commercial kitchens, locker rooms, and pool decks.
Each of these has the right application. The best choice depends on your space, your traffic, your aesthetic goals, and your budget.
Matching Your Finish to Your Space
This is where a lot of projects go sideways. Homeowners pick a finish based on how it looks in a photo. Then it underperforms in their actual environment.
Garage floors need impact resistance and oil resistance. A 100% solid epoxy base with a polyaspartic topcoat is a proven combination. Add a decorative flake broadcast for texture and visual interest.
Basement floors need moisture-tolerant systems. The coating must be compatible with vapor emission from below. A moisture-tolerant epoxy primer is essential here. Finish options are wide open once the moisture is addressed.
Commercial and industrial floors need durability above aesthetics. Thickness matters. Chemical resistance matters. Slip ratings matter. System design should be driven by the specific operating conditions of the space.
Showrooms and retail spaces can prioritize appearance without sacrificing durability. Metallic epoxy or high-gloss polyaspartic systems create impact while still handling foot traffic and cleaning chemicals.
In Woodland Park, NJ, climate is a real factor in this decision. Temperature swings affect how coatings cure and how they expand and contract over time. A locally experienced installer understands this. A national chain installer often doesn't.
The Full Process, Start to Finish
Here's what a professional floor restoration actually looks like when it's done right.
Step 1 Assessment. The installer evaluates the slab condition, identifies crack types, tests for moisture, and checks for contaminants. This step determines everything that follows.
Step 2 Crack repair. The appropriate repair method is selected for each crack type. Repairs are made and allowed to cure before surface prep begins.
Step 3 Surface preparation. Shot blasting or diamond grinding opens the concrete profile. The surface is cleaned thoroughly.
Step 4 Primer application. A penetrating primer is applied to promote adhesion and seal the surface.
Step 5 Base coat application. The primary coating layer goes down. This may include broadcast aggregate depending on the system.
Step 6 Topcoat application. The final protective layer is applied. This provides UV stability, chemical resistance, and the final surface sheen.
Step 7 Cure time. The floor is left undisturbed for the appropriate cure period before foot traffic or vehicle use begins.
Each step depends on the previous one being done correctly. There are no shortcuts that don't cost you later.
The Concrete Repair Question People Ask Too Late
Most people only think about concrete repair after a crack has become a problem. By then, it's bigger, it's let in moisture, and the repair is more involved than it needed to be.
The smarter move is addressing it early. Small cracks are cheap and fast to fix. Large, neglected cracks especially in climates like Woodland Park, NJ where freeze-thaw cycles expand them every winter can require significant work before any premium finish can be applied.
There are also situations where crack repair isn't just cosmetic. A slab with active structural movement may need stabilization work before surface repair makes sense. Applying a finish over an unstable slab is money wasted. The cracks will return. The coating will fail. And you'll do it all again.
The honest advice is this: assess your slab condition before you pick your finish. The condition of your concrete determines your options. Not the other way around.
DIY vs. Professional:
This is a topic worth being direct about.
Some floor repair and coating work is genuinely DIY-friendly. Filling small surface cracks with an epoxy paste product is within reach for a handy homeowner. Applying a water-based epoxy paint over a clean, prepared surface is manageable.
But most premium floor finish systems are not designed for DIY application. They require equipment (shot blasters, grinders, squeegees, spiked rollers), environmental controls (temperature, humidity), mixing precision, and application speed that comes from experience. Getting it wrong means a failed floor and a more expensive professional repair afterward.
The decision framework is simple. If you want a basic, low-budget coating for a personal garage DIY is viable with the right prep and patience. If you want a premium finish that performs and lasts in a demanding environment hire a professional with documented experience in resin flooring systems.
A good installer is also an honest one. They'll tell you if your slab isn't ready. They'll recommend the system that fits your actual needs, not the most expensive one. Ask for references. Ask to see completed projects. Ask specifically about their concrete assessment process.
What Separates a Good Installer from a Great One
This matters more than the product brand.
A great installer starts with professional floor assessment and crack diagnosis before touching a tool. They don't quote a job before seeing the slab in person. They test for moisture, identify crack types, and assess load-bearing requirements. Their quote reflects real conditions, not assumptions.
They also understand that expert concrete surface preparation services are the foundation of every successful coating project. They don't rush prep to save time. They know that one hour of missed prep creates ten hours of future repair work.
Beyond technical skill, the best installers communicate clearly. They explain what they found, what they're doing, and why. They set realistic expectations for cure time and maintenance. And they stand behind their work.
In a market like Woodland Park, NJ where property owners are making real investments in their floors that combination of skill and transparency is what defines a professional worth hiring.
Maintenance That Protects Your Investment
A premium floor finish is a long-term investment. Maintaining it properly extends that investment significantly.
Daily care is simple. Sweep or dust mop to remove grit and debris. Grit is abrasive. Left on the surface, it acts like sandpaper under foot traffic and slowly dulls the finish.
Regular cleaning means mopping with a neutral pH cleaner diluted in water. Avoid acidic or alkaline cleaners they degrade epoxy and polyaspartic topcoats over time. Avoid abrasive scrubbing pads.
Immediate spill response matters in chemical environments. Most premium coatings handle incidental spills well, but prolonged contact with harsh chemicals can affect the topcoat. Wipe up spills promptly.
Periodic inspection catches problems early. Check for any areas where the coating looks dull, slightly lifted, or where a crack is beginning to show through. Early intervention is always cheaper than full repair.
Topcoat refresh is an option when the surface starts to show wear but the base coat is still sound. A fresh topcoat restores appearance and protection without a full reinstallation.
With proper maintenance, a well-installed premium floor finish should last 15 to 25 years in most environments.
Cost Expectations: What Honest Numbers Look Like
Floor finish projects vary widely in cost. Here's a realistic breakdown.
Crack repair runs from about $3 to $10 per linear foot for surface repairs. Deep structural crack injection can run significantly higher depending on depth and length.
Surface preparation is typically $1 to $3 per square foot for professional shot blasting and grinding. This cost is often bundled into a full installation quote.
Epoxy coating systems for residential use range from $3 to $7 per square foot installed professionally. Commercial and industrial systems with multiple layers run $6 to $12 or more per square foot.
Premium decorative systems metallic epoxy, quartz broadcast, multi-coat polyaspartic start around $8 per square foot and can go higher for complex designs.
DIY kits for basic epoxy range from $0.50 to $2 per square foot in materials. But factor in equipment rental, primer, and topcoat separately if they're not included.
The most important cost consideration is lifecycle value. A $4 per square foot coating that fails in 5 years costs more over 20 years than a $9 per square foot system that holds for 20. Do the math before defaulting to the cheapest option.
FAQ
Q: Can I apply a floor coating over existing cracks without repairing them first?
No. Unrepaired cracks will telegraph through the coating. Moisture will continue to enter. The crack will grow. The coating will eventually fail along the crack line. Repair first, always.
Q: How do I know if a crack is structural or just cosmetic?
Width, depth, displacement, and growth are the key indicators. A crack wider than 1/4 inch, one where the two sides are at different heights, or one that has visibly grown over time should be evaluated by a professional before any repair or coating work begins.
Q: What's the fastest floor finish option for minimal downtime?
Polyaspartic coatings cure the fastest; some systems allow light foot traffic in as little as 2 to 4 hours. For full vehicle traffic, cure times vary by product and temperature. MMA resin systems also offer very fast cure for industrial applications.
Q: How long does crack repair need to cure before I can apply epoxy?
It depends on the repair product. Some epoxy fillers cure fast enough to accept coating within hours. Others need 24 hours. Always follow the manufacturer's guidelines, rushing this step causes bond failure between the repair and the coating.
Q: Is epoxy flooring slippery when wet?
A smooth epoxy surface can be slippery when wet. This is why slip-resistant additives, broadcast aggregate, or textured topcoats are used in areas with water exposure. Slip resistance is a design decision, not a given make sure your installer addresses it.
Q: How do Woodland Park, NJ winters affect concrete and coatings?
Freeze-thaw cycles are hard on uncoated concrete. Water enters cracks, freezes, expands, and widens them. A properly sealed and coated floor dramatically reduces this damage. Coatings should be applied in appropriate temperature conditions — most systems require above 50°F for proper cure.
Q: What maintenance does a premium epoxy floor actually need?
Sweep regularly. Mop with a neutral cleaner. Wipe spills promptly. Inspect annually. Avoid harsh abrasives. That's genuinely all it takes for most residential and light commercial floors.